AWS Serverless CI/CD hands on lab
SAM Lab
Prepare the hands on lab code
-
Fork the github repository: https://github.com/nikosheng/sam-cicd and clone your repository to your environment such as Cloud9
-
Install AWS CLI, Python 3 & Pip 3, Docker and setup the python virtualenv
-
Install SAM CLI
Local development
- Build the project ```bash cd sam-cicd sam build
Build Succeeded
Built Artifacts : .aws-sam/build Built Template : .aws-sam/build/template.yaml
1. Invoking function locally using a local sample payload
```bash
sam local invoke HelloWorldFunction --event event.json

Invoking app.lambda_handler (python3.7)

Fetching lambci/lambda:python3.7 Docker container image.................................................................................

Mounting /home/ec2-user/workspace/sam-cicd/.aws-sam/build/HelloWorldFunction as /var/task:ro,delegated inside runtime container
START RequestId: d27c75d0-1218-1bca-b08d-0100d39feb2d Version: $LATEST
END RequestId: d27c75d0-1218-1bca-b08d-0100d39feb2d
REPORT RequestId: d27c75d0-1218-1bca-b08d-0100d39feb2d  Init Duration: 319.41 ms        Duration: 459.81 ms     Billed Duration: 500 ms Memory Size: 128 MB     Max Memory Used: 30 MB

{"statusCode":200,"body":"{\"message\": \"hello world! v1.4\", \"location\": \"68.79.5.140\"}"}
- Invoking function locally through local API Gateway
- Start local API Gateway ```bash sam local start-api
Mounting HelloWorldFunction at http://127.0.0.1:3000/hello [GET] You can now browse to the above endpoints to invoke your functions. You do not need to restart/reload SAM CLI while working on your functions, changes will be reflected instantly/automatically. You only need to restart SAM CLI if you update your AWS SAM template 2020-10-20 09:18:37 * Running on http://127.0.0.1:3000/ (Press CTRL+C to quit)
- Invoke local API Gateway
```bash
curl http://127.0.0.1:3000/hello
{"message": "hello world! v1.4", "location": "68.79.5.140"}
- Check the SAM logs ``` Invoking app.lambda_handler (python3.7)
Fetching lambci/lambda:python3.7 Docker container image…… Mounting /home/ec2-user/workspace/sam-cicd/.aws-sam/build/HelloWorldFunction as /var/task:ro,delegated inside runtime container START RequestId: 5039dc9e-eba4-1ab4-a641-7c48576d91ef Version: $LATEST END RequestId: 5039dc9e-eba4-1ab4-a641-7c48576d91ef REPORT RequestId: 5039dc9e-eba4-1ab4-a641-7c48576d91ef Init Duration: 396.17 ms Duration: 481.82 ms Billed Duration: 500 ms Memory Size: 128 MB Max Memory Used: 30 MB No Content-Type given. Defaulting to ‘application/json’. 2020-10-20 09:23:55 127.0.0.1 - - [20/Oct/2020 09:23:55] “GET /hello HTTP/1.1” 200 -
## Packaging and deployment via SAM CLI
1. Package
```bash
cd .aws-sam/build/
sam package --template-file template.yaml \
    --output-template-file packaged.yaml \
    --s3-bucket serverless-hands-on --s3-prefix sam-app-demo
- Deploy
```bash
sam deploy
–template-file packaged.yaml
–stack-name sam-app-demo
–capabilities CAPABILITY_IAM
–region cn-north-1
Successfully created/updated stack - sam-app-demo in cn-north-1
3. Retrieve the API Gateway Endpoint URL:
```bash
aws cloudformation describe-stacks \
    --stack-name sam-app-demo \
    --query 'Stacks[].Outputs[?OutputKey==`HelloWorldApi`].OutputValue' \
    --output table --region cn-north-1

curl <HelloWorldApi_RUL>
- Fetch, tail, and filter Lambda function logs
sam logs -n HelloWorldFunction --stack-name sam-app-demo --tail --region cn-north-1
Testing
cd sam-cicd
pip install pytest pytest-mock --user
python -m pytest tests/ -v

tests/unit/test_handler.py::test_lambda_handler PASSED                                   [100%]
Cleanup
aws cloudformation delete-stack --stack-name sam-app-demo --region cn-north-1
Serverless CI/CD Pipeline
Due to AWS CodePipeline has not been launched in China region, the below lab are running on us-east-1. If you want to run the lab on China region, please check the Lab CICD-Jenkins
Build the project using AWS CodeBuild
- Create the IAM role for pipeline
- Trusted entity –
AWS CloudFormation - Permissions –
AWSLambdaExecute - Role name –
cfn-lambda-pipeline
- Trusted entity –
- Add inline policy with name
cfn-lambda-pipeline-inline{ "Statement": [ { "Action": [ "apigateway:*", "codedeploy:*", "lambda:*", "cloudformation:CreateChangeSet", "iam:GetRole", "iam:CreateRole", "iam:DeleteRole", "iam:PutRolePolicy", "iam:AttachRolePolicy", "iam:DeleteRolePolicy", "iam:DetachRolePolicy", "iam:PassRole", "s3:GetObjectVersion", "s3:GetBucketVersioning" ], "Resource": "*", "Effect": "Allow" } ], "Version": "2012-10-17" }
Create the Pipeline
Create a pipeline to deploy the application. The pipeline monitors Github repository changes, runs AWS CodeBuild builds to create deployment packages, and uses AWS CloudFormation to deploy applications. In the process of creating a pipeline, you can also create an AWS CodeBuild build project.
- Create the AWS CodePipeline
- Pipeline name –
aftership-lambda-pipeline - Service role -
New service Role(aftership-lambda-pipeline-role) Allow AWS CodePipeline to create a service role so it can be used with this new pipelineAdvanced settings-Artifact Store–Default location
- Pipeline name –
- Source Provider
- Source provider –
Github (version1) Connect to Github- Repository name –
sam-cicd - Branch name –
master - Change detection options –
Github Webhook
- Source provider –
- Add build stage
- Build provider -
AWS CodeBuild - Region – US East (us-east-1)
- Project -
create Project - Project Name –
aftership-codebuild - Environment image –
Managed image– Operating system -ubuntu- Runtime(s) -standard- Image -aws/codebuild/standard:4.0- Image version -Always use the latest image for runtime version- Environment type -Linux - Service role –
New service role–codebuild-aftership-lambda-pipeline-service-role - Environment variables
- S3_BUCKET
aftership-serverless-demo-bucket - REGION
us-east-1- Buildspec – Build specifications –Use a buildspec file- Logs –CloudWatch logs - optional-/aws/codebuild/aftership-serverlessas logs group name - Continue to CodePipeline - Build type -Single Build
- Build provider -
- Add deploy stage
- Deploy provider – AWS CloudFormation
- Region- US East (us-east-1)
- Action mode –
create or update a stack - Stack Name -
aftership-lambda-pipeline-stack - Template –
BuildArtifact::packaged.yaml - Template Configuration -
Use configuration file-BuildArtifact::cfn-template-config.json - Capabilities –
CAPABILITY_IAM & CAPABILITY_AUTO_EXPAND - Role name (角色名称) –
cfn-lambda-pipeline
- Create the Pipeline
It will failed on Build stage due to permission issue
- Update the
codebuild-aftership-lambda-pipeline-service-roleIAM Role- Add the
AmazonS3FullAccesspolicy - Click the Pipeline
Release changeto trigger the Pipeline again
- Add the
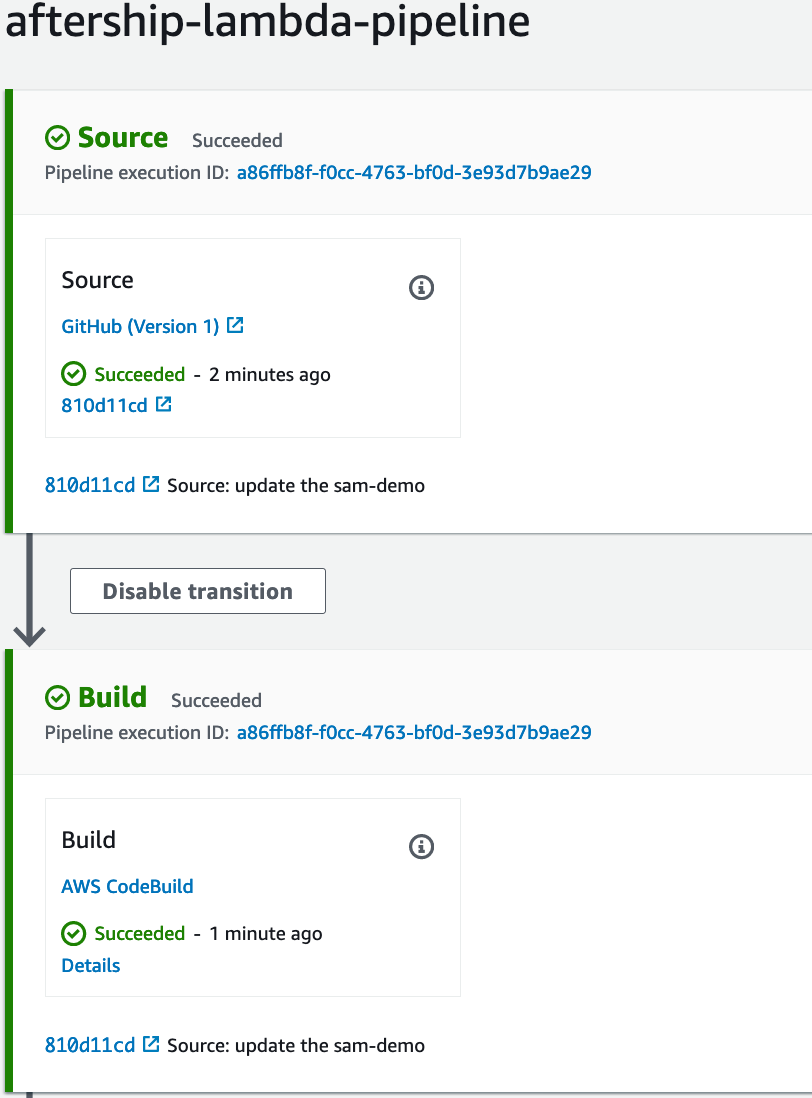
If you find the Deploy stage failed with AWS CloudFormation error, you can continue, we will confiure the CodeDeploy for Lambda canary deployment
No deployment configuration found for name: Canary20Percent3Minutes
CodeDeploy for Lambda canary deployment
-
Open the
CodeDeploy->Deployment configurations - Create deployment configuration
- Deployment configuration name -
Canary20Percent3Minutes - Compute platform –
AWS Lambda - Type –
Canary - Step - Enter a percentage of traffic to shift to your new deployment target. –
20 - Interval - Enter the number of minutes between traffic shifts - 3
- Deployment configuration name -
- Modify the CodeDeploy template
- Edit template.yaml, to add
Canary20Percent3Minutes
- Edit template.yaml, to add
 DeploymentPreference:
    Type: String
    Default: AllAtOnce
    AllowedValues:
      - Canary20Percent3Minutes
      - Canary50Percent1Minutes
      - Canary50Percent5Minutes
      - Canary10Percent5Minutes
      - Canary10Percent10Minutes
      - Canary10Percent15Minutes
      - Canary10Percent30Minutes
      - Linear10PercentEvery1Minute
      - Linear10PercentEvery2Minute
      - Linear10PercentEvery3Minute
      - Linear10PercentEvery10Minute
      - AllAtOnce
- Modify the
cfn-template-config.json"DeploymentPreference": "Canary20Percent3Minutes" - Modify hello_world/app.py
from datetime import datetime

    now = datetime.now()
    dt_string = now.strftime("%Y-%m-%d-%H-%M-%S")
    return {
        "statusCode": 200,
        "body": json.dumps({
            "message": "hello world! canary " + dt_string,
            "location": ip.text.replace("\n", "")
        }),
    }
- Commit the change
git status git add . git commit -m "update app.py" git push - Monitor the CodePipeline
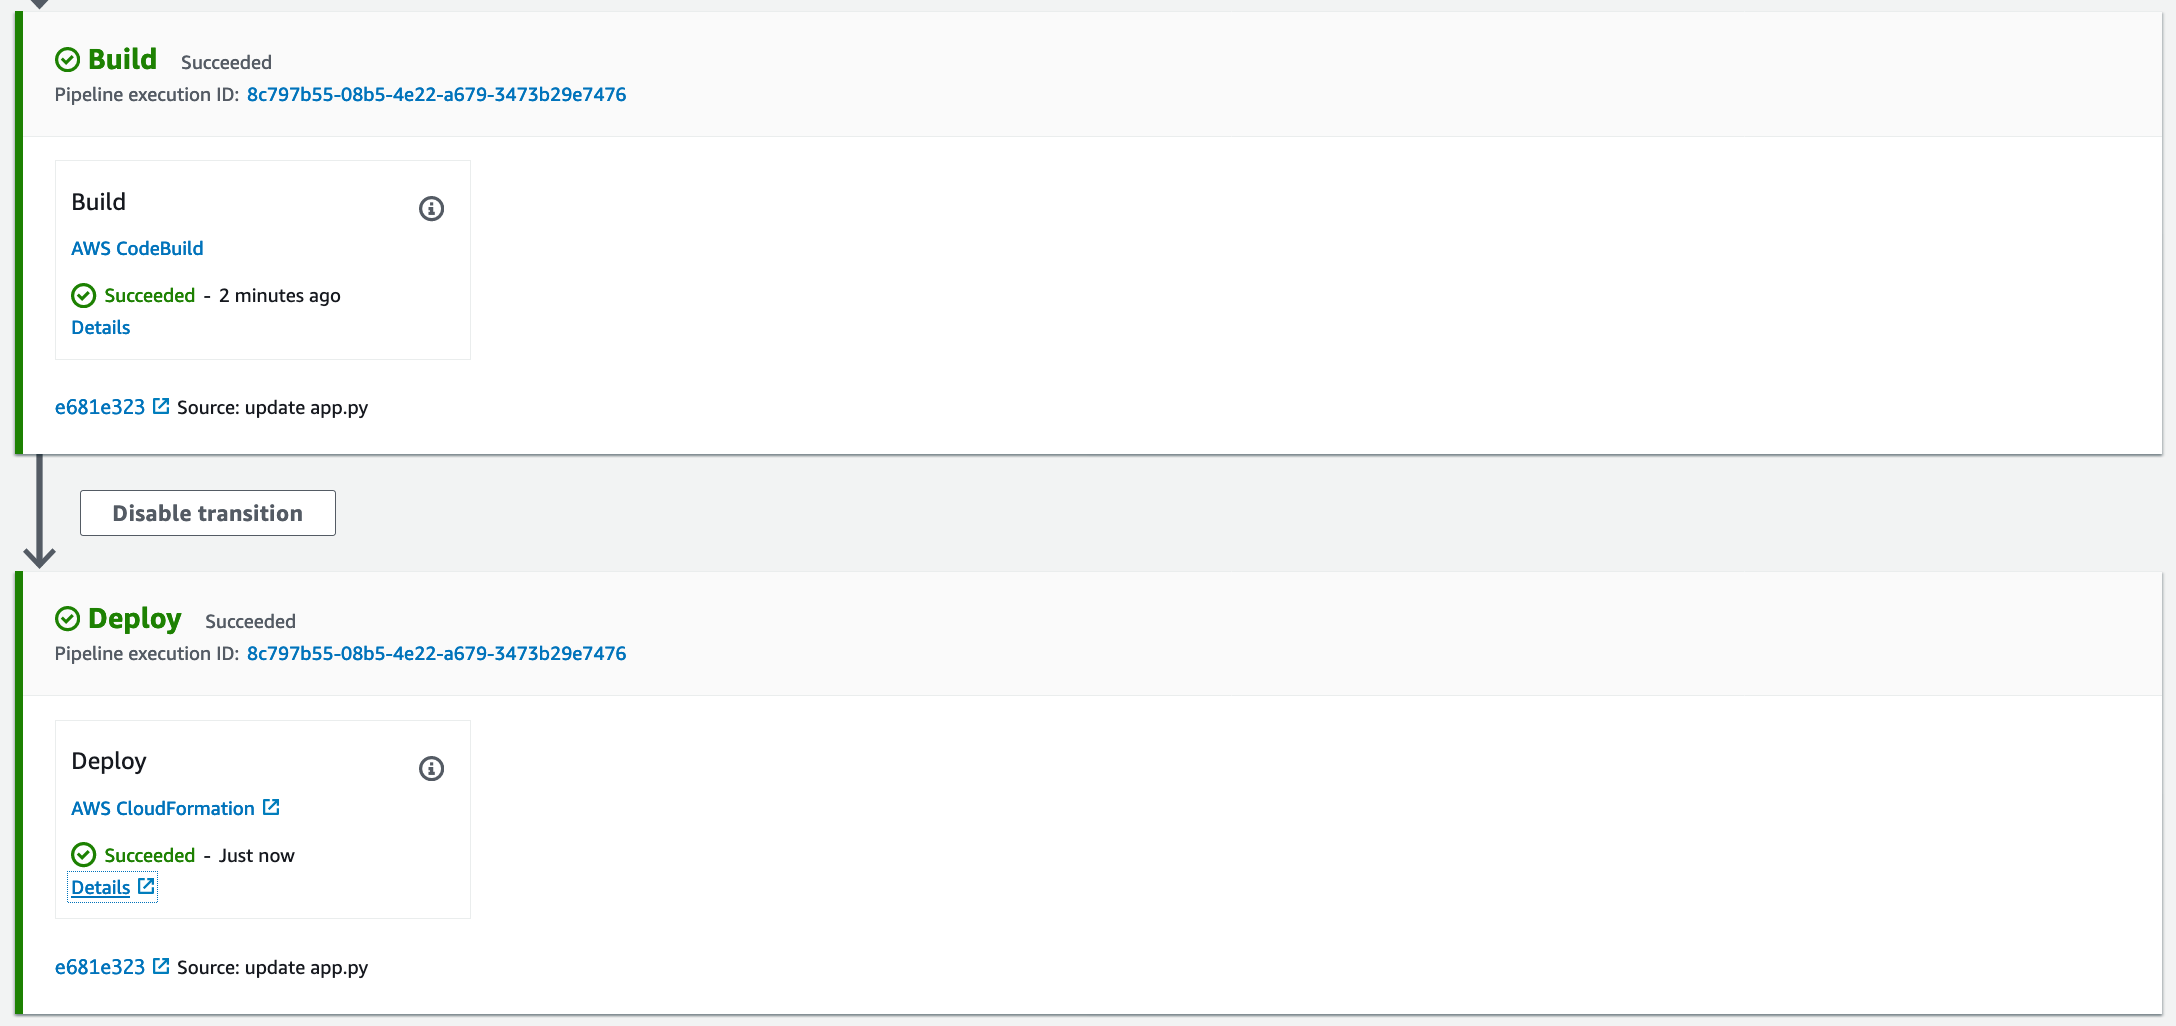
Testing
curl https://ac0acgrwej.execute-api.us-east-1.amazonaws.com/staging/hello

{"message": "hello world! canary 2020-10-21-23-37-32", "location": "100.24.118.93"}
Modify the hello_world/app.py code as below
return {
        "statusCode": 200,
        "body": json.dumps({
            "message": "hello world! Latest canary " + dt_string,
            "location": ip.text.replace("\n", "")
        }),
    }
After you submit, you can monitor the deployment

And you can testing the URL, you can find the hello world! Latest canary
{"message": "hello world! canary 2020-10-21-23-42-49", "location": "100.24.118.93"}[ec2-user@ip-10-0-2-83 sam-cicd]$ curl https://ac0acgrwej.execute-api.us-east-1.amazonaws.com/staging/hello
{"message": "hello world! canary 2020-10-21-23-42-51", "location": "100.24.118.93"}[ec2-user@ip-10-0-2-83 sam-cicd]$ curl https://ac0acgrwej.execute-api.us-east-1.amazonaws.com/staging/hello
{"message": "hello world! canary 2020-10-21-23-42-53", "location": "100.24.118.93"}[ec2-user@ip-10-0-2-83 sam-cicd]$ curl https://ac0acgrwej.execute-api.us-east-1.amazonaws.com/staging/hello
{"message": "hello world! Latest canary 2020-10-21-23-42-56", "location": "18.204.205.147"}[ec2-user@ip-10-0-2-83 sam-cicd]$ curl https://ac0acgrwej.execute-api.us-east-1.amazonaws.com/staging/hello
Using Jenkins and CodeDeploy automatic deploy Lambda
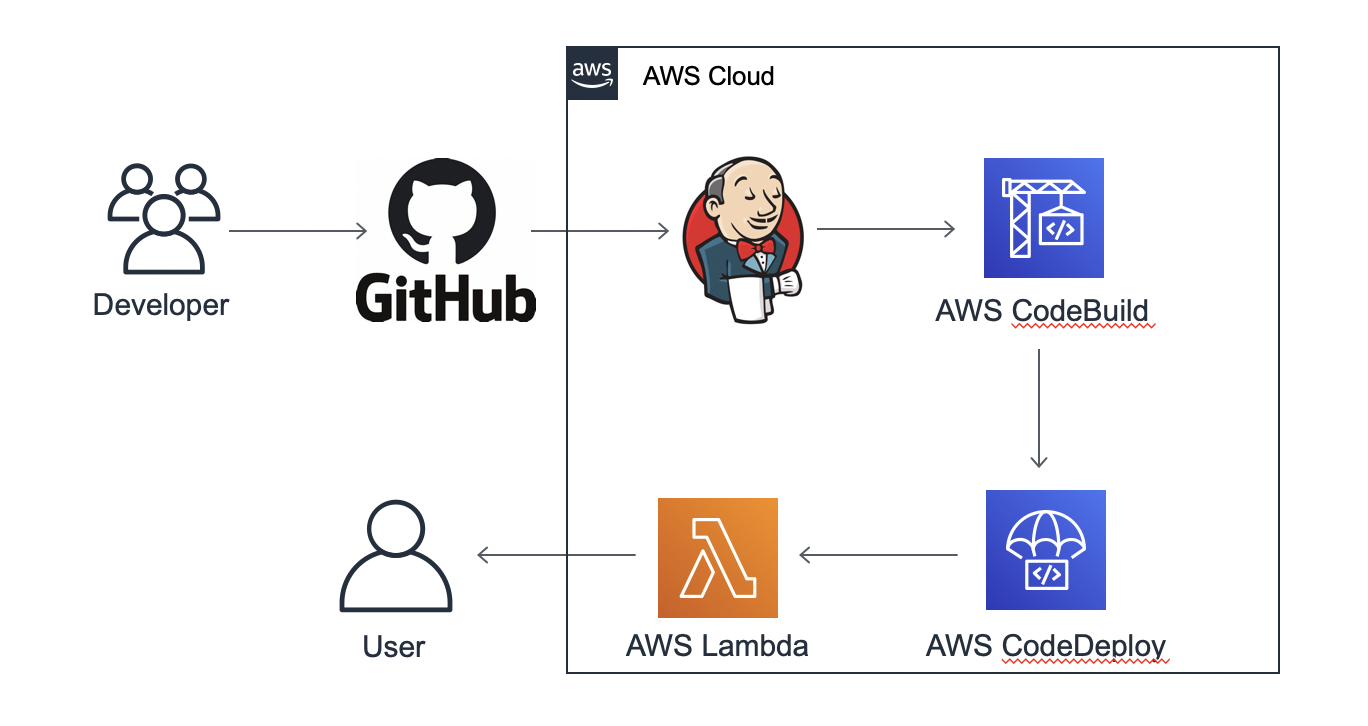
Jenkins Server setup
- Launch the EC2 with Amazon Linux 2 AMI and Security group open 22, 8080, 443 ports
- Set the EC2 instance profile has permission to access the lambda, S3, CodeBuild, CodeDeploy
- Install Jenkins
```bash
sudo yum install java #安装java
此为官方镜像
sudo wget -O /etc/yum.repos.d/jenkins.repo https://pkg.jenkins.io/redhat-stable/jenkins.repo sudo rpm –import https://pkg.jenkins.io/redhat-stable/jenkins.io.key sudo yum install jenkins sudo chkconfig jenkins on sudo service jenkins start
sudo yum install git -y sudo yum install docker -y sudo service docker start
4. Check the Jenkins initial password
```bash
sudo cat /var/lib/jenkins/secrets/initialAdminPassword
- Open the Jenkins Web Page: http://EC2_IP:8080/
- Install suggested plugins
- Configure the First Admin User: jenkinsAdmin
Github integration
- New personal access token for Jenkins access github

The scope:
- admin:repo_hook - For managing hooks at GitHub Repositories level including for Multibranch Pipeline
- admin:org_hook - For managing hooks at GitHub Organizations level for GitHub Organization Folders
- repo - to see private repos. Please note that this is a parent scope, allowing full control of private repositories that includes:
- repo:status - to manipulate commit statuses
- repo:repo_deployment - to manipulate deployment statuses
- repo:public_repo - to access to public repositories
- read:org and user:email - recommended minimum for GitHub OAuth Plugin scopes.
- notifications
- Add the Github Webhooks
- Create a specific user
github_hookin Jenkins for GitHub pushes and to grant it Overall read, Job create and Job read. - Select the sam-cicd github repo
- Settings - Webhooks - Add webhook
- Payload URL - http://github_hook:APITOKEN@EC2_IP:8080/github-wekhook/ or http://github_hook:APITOKEN@ALB_Domain/github-wekhook/
- Create a specific user
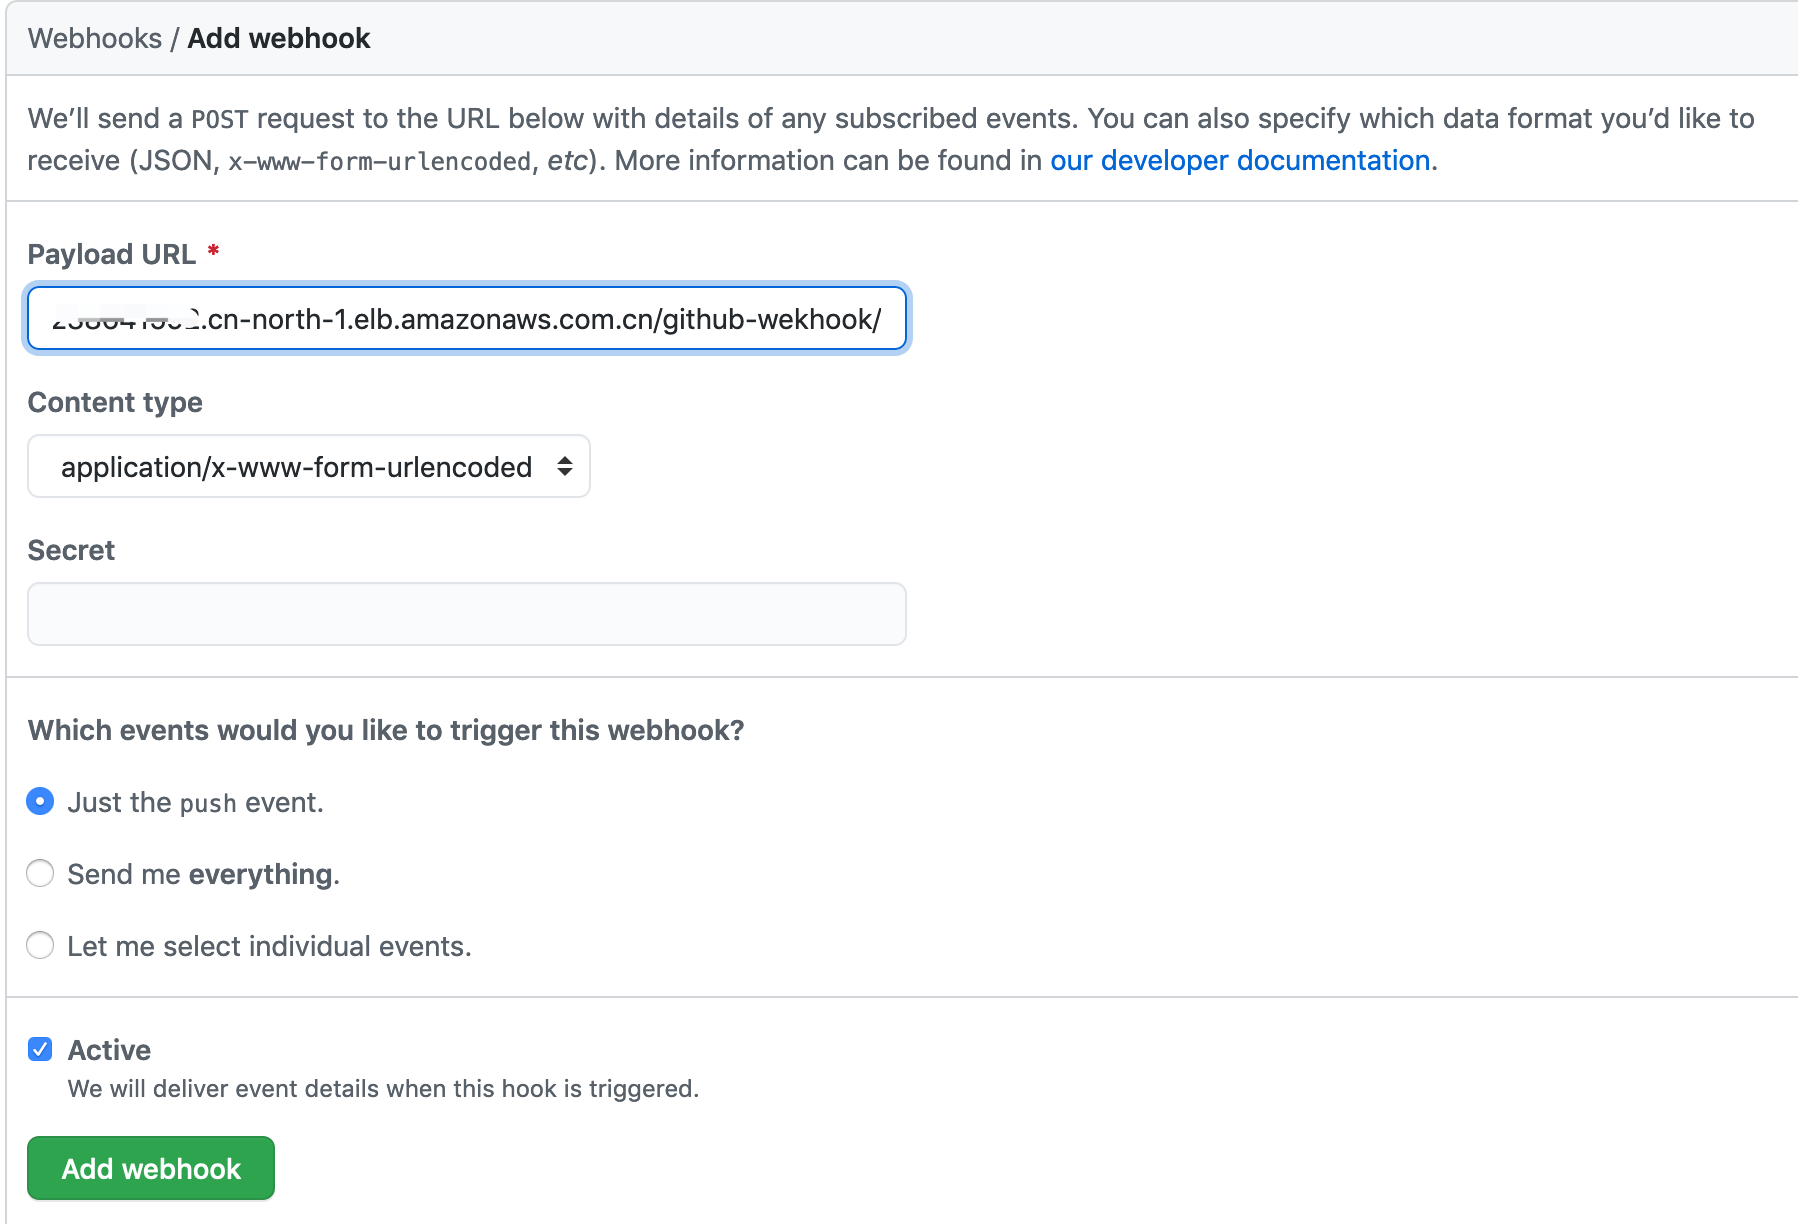
- Jenkins Setting for Github Webhooks
- Manage Jenkins - System Configuration - GitHub

- secret text -
Github Access Token
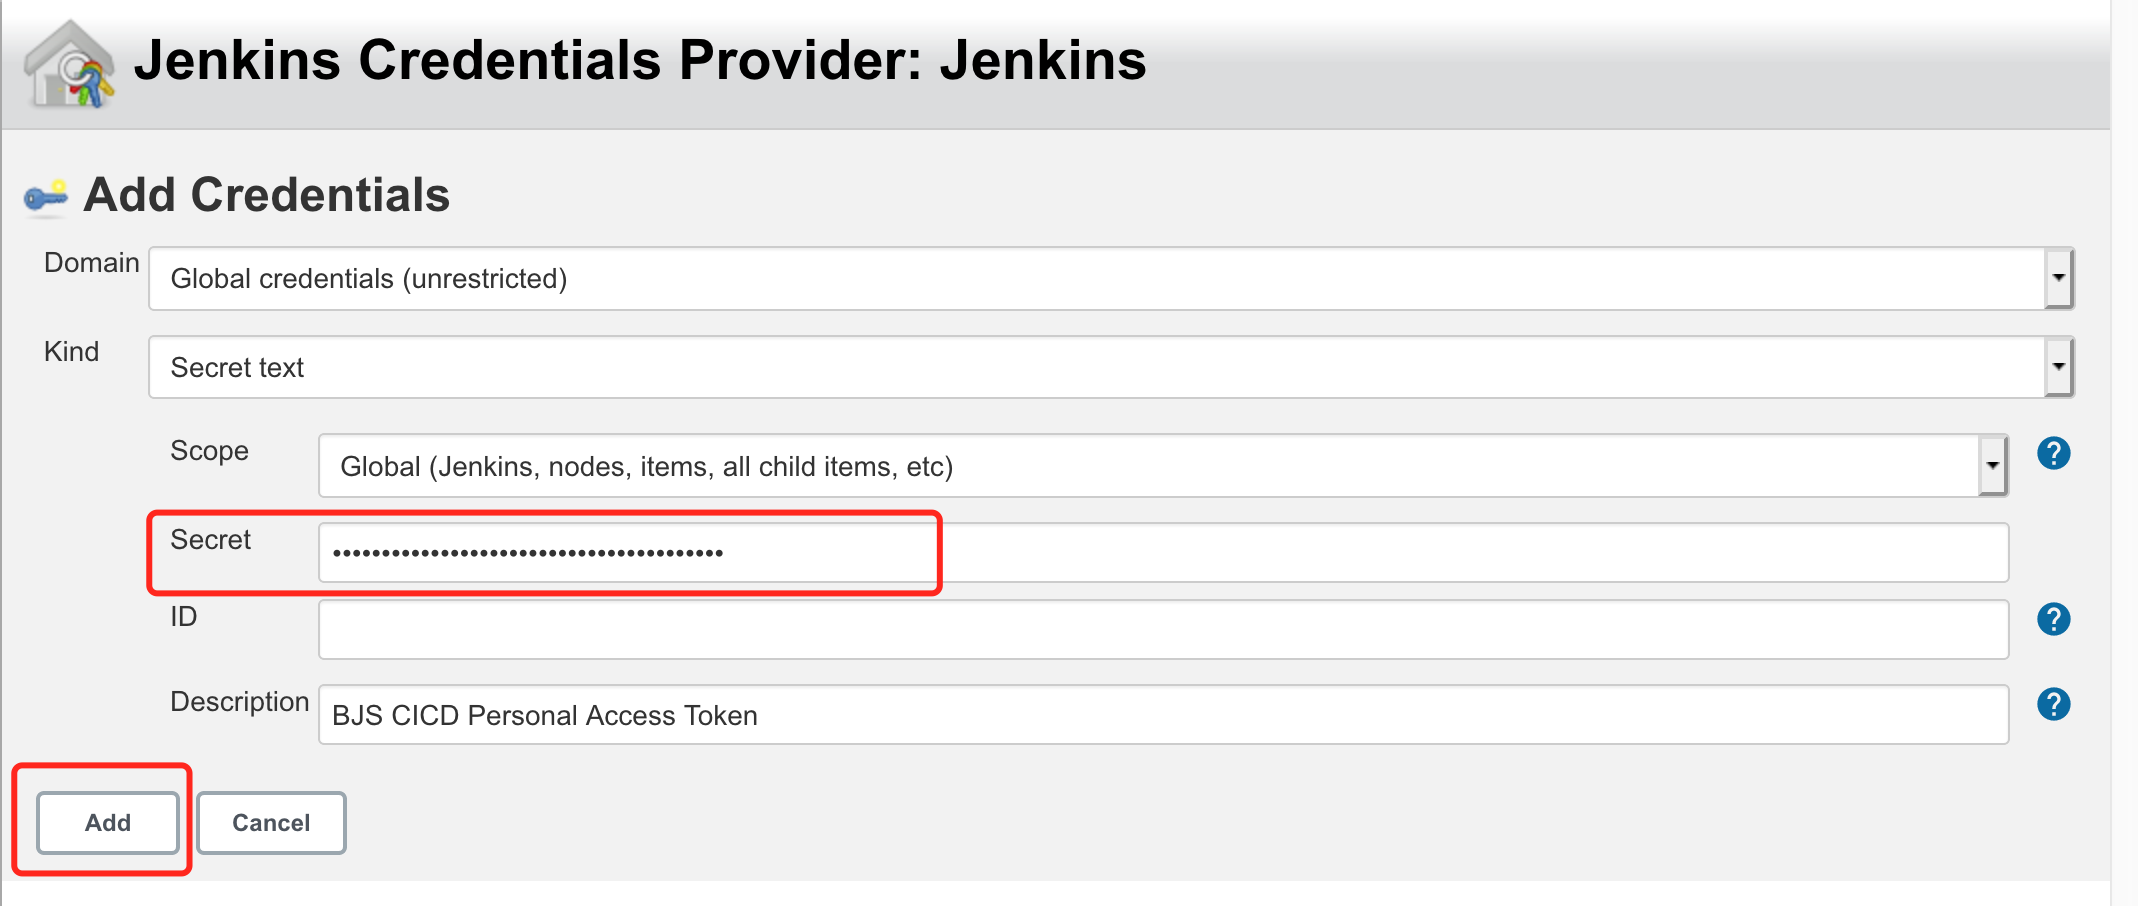
- Test connection

Prepare the source code
- In your sam_cicd project ```bash mkdir jenkins_hello_world cd jenkins_hello_world/
wget https://raw.githubusercontent.com/aws-samples/aws-serverless-workshop-greater-china-region/master/Lab8B-CICD-Jenkins/buildspec.yml
wget https://raw.githubusercontent.com/aws-samples/aws-serverless-workshop-greater-china-region/master/Lab8B-CICD-Jenkins/appspec.template.yaml
wget https://raw.githubusercontent.com/aws-samples/aws-serverless-workshop-greater-china-region/master/Lab8B-CICD-Jenkins/lambda_function.py
2. Using the lambda_function.py to create the simple lambda function `jenkins-cicd-helloworld`
3. publish lambda,with version `1` and create the alias `stable_helloworld`
4. Update the appspec.template.yaml and buildspec.yml
## Configure the CodeDeploy
1. Create CodeDeploy application `first-try-with-jenkins`, Computer Platform as `lambda`
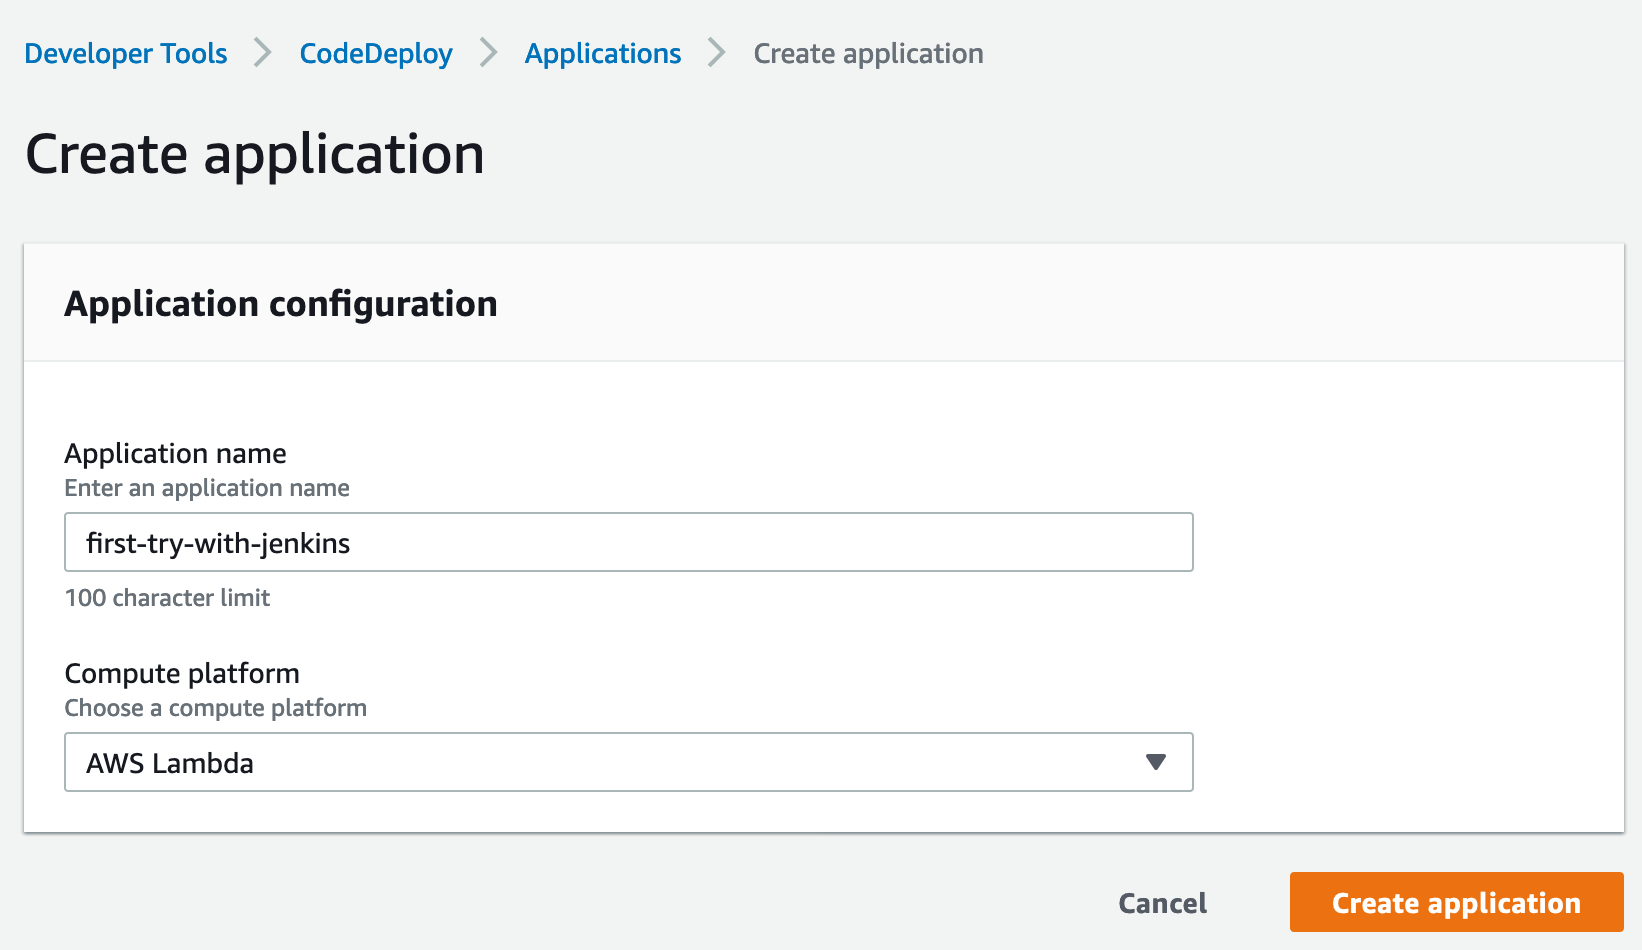
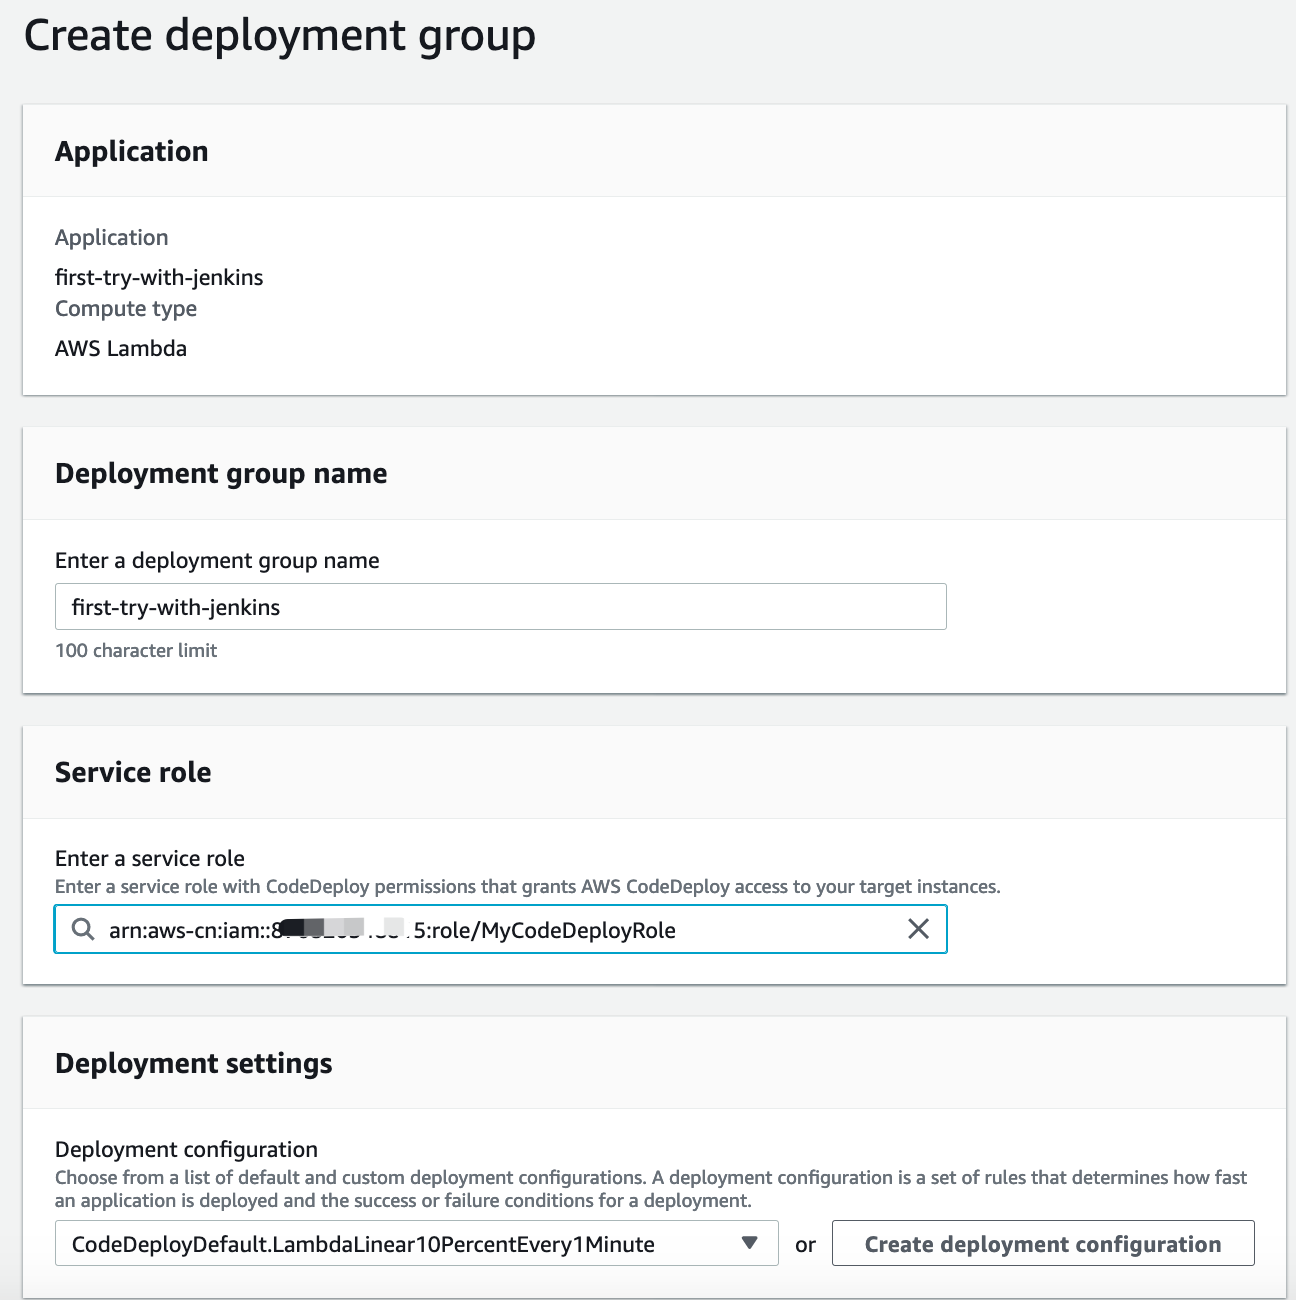
2. Create deployment group under application with group name `first-try-with-jenkins`
## Create Jenkins Project
1. Create a new project - `freestyle project` - `AWS-BJS-CodeDeploy-Jenkins` as Name
2. Source Management - Git - `https://github.com/you_account/sam-cicd.git`
3. Trigger - `Github hook trigger for GITScm polling`
4. Add the execution Shell and update based on the buildspec.yml content
```bash
ls
mkdir -p jenkins_build
CurrentVersion=$(echo $(aws lambda get-alias --function-name arn:aws-cn:lambda:cn-north-1:account_id:function:jenkins-cicd-helloworld --name stable_helloworld --region cn-north-1 | grep FunctionVersion | tail -1 |tr -cd "[0-9]"))
zip -r ./jenkins_build/lambda.zip ./jenkins_hello_world/lambda_function.py
aws lambda update-function-code --function-name arn:aws-cn:lambda:cn-north-1:account_id:function:jenkins-cicd-helloworld --zip-file fileb://jenkins_build/lambda.zip --region cn-north-1 --publish
TargetVersion=$(echo $(aws lambda list-versions-by-function --function-name arn:aws-cn:lambda:cn-north-1:account_id:function:jenkins-cicd-helloworld --region cn-north-1 | grep Version | tail -1 | tr -cd "[0-9]"))
echo $CurrentVersion
echo $TargetVersion
sed -e 's//'$CurrentVersion'/g' -e 's//'$TargetVersion'/g' ./jenkins_hello_world/appspec.template.yaml > appspec.yaml
aws s3 cp appspec.yaml s3://serverless-hands-on/jenkins_build/helloworld/codedeploy/appspec.yaml --region cn-north-1
rm ./jenkins_hello_world/appspec.template.yaml
cat appspec.yaml
aws deploy create-deployment --region cn-north-1 --application-name first-try-with-jenkins --deployment-group-name first-try-with-jenkins --s3-location bucket='serverless-hands-on',key='jenkins_build/helloworld/codedeploy/appspec.yaml',bundleType=YAML
- git commit, git push to trigger the CodeBuild
- Check the Jenkins Build result
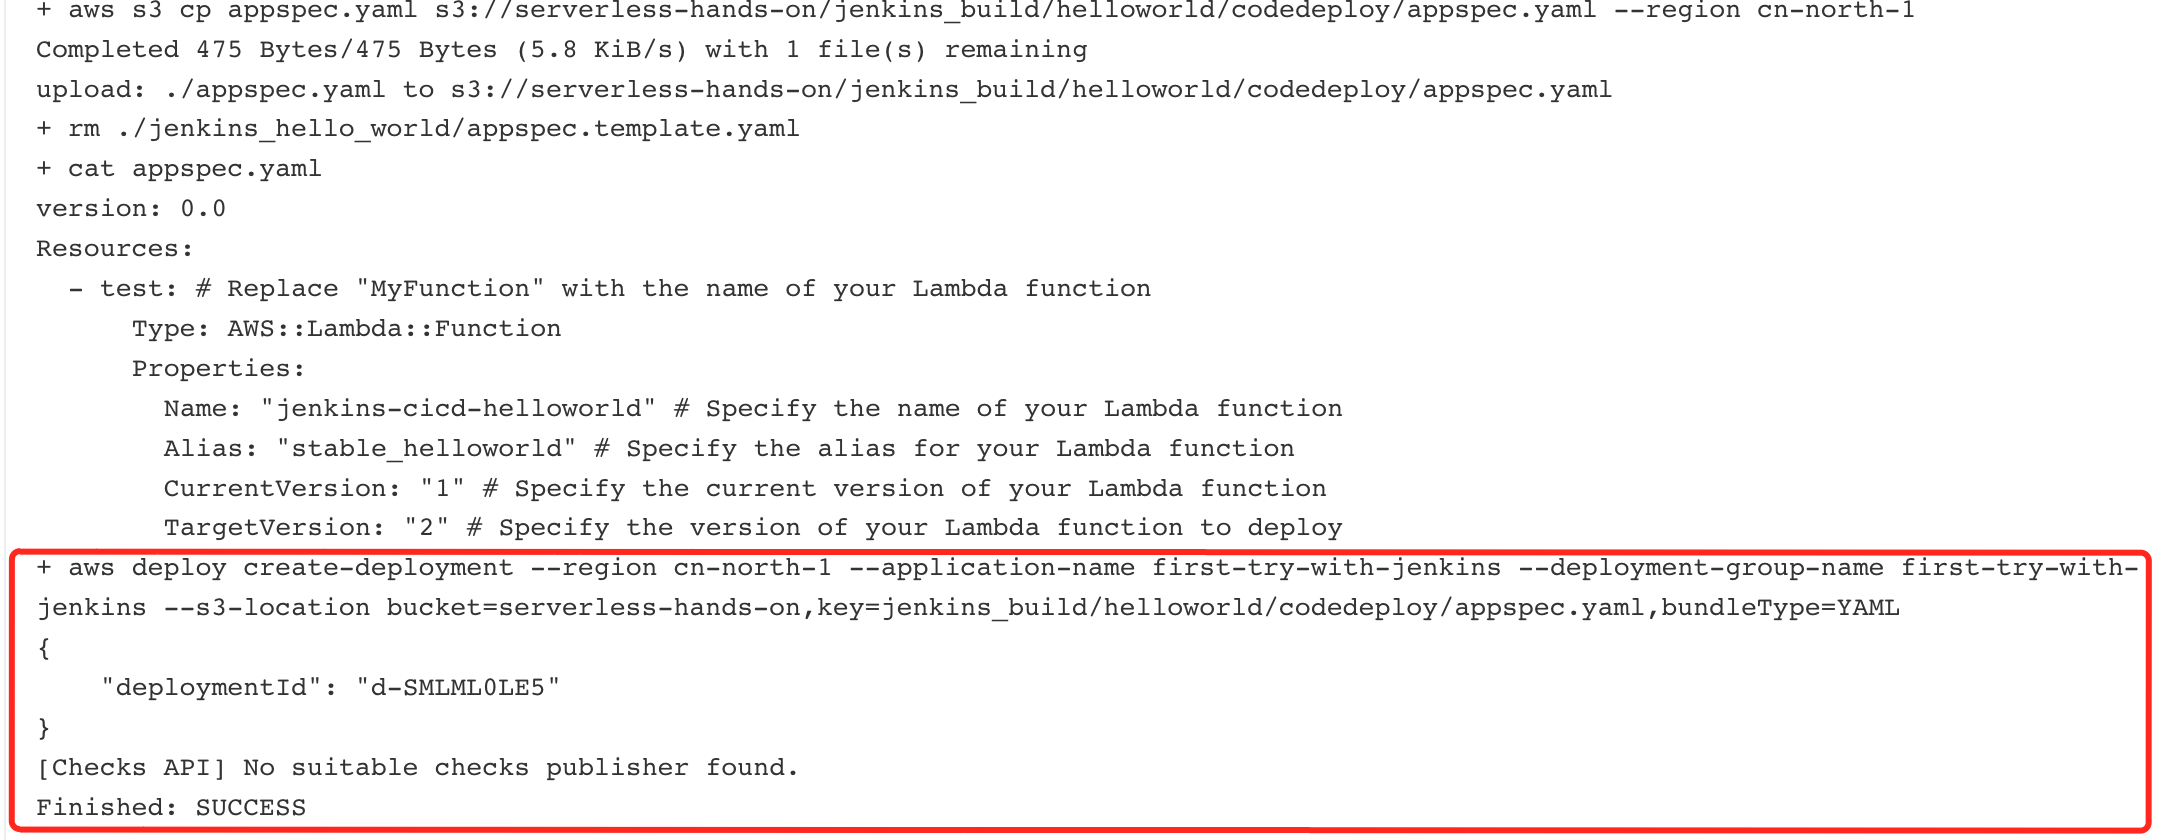
- Check the CodeBuild result
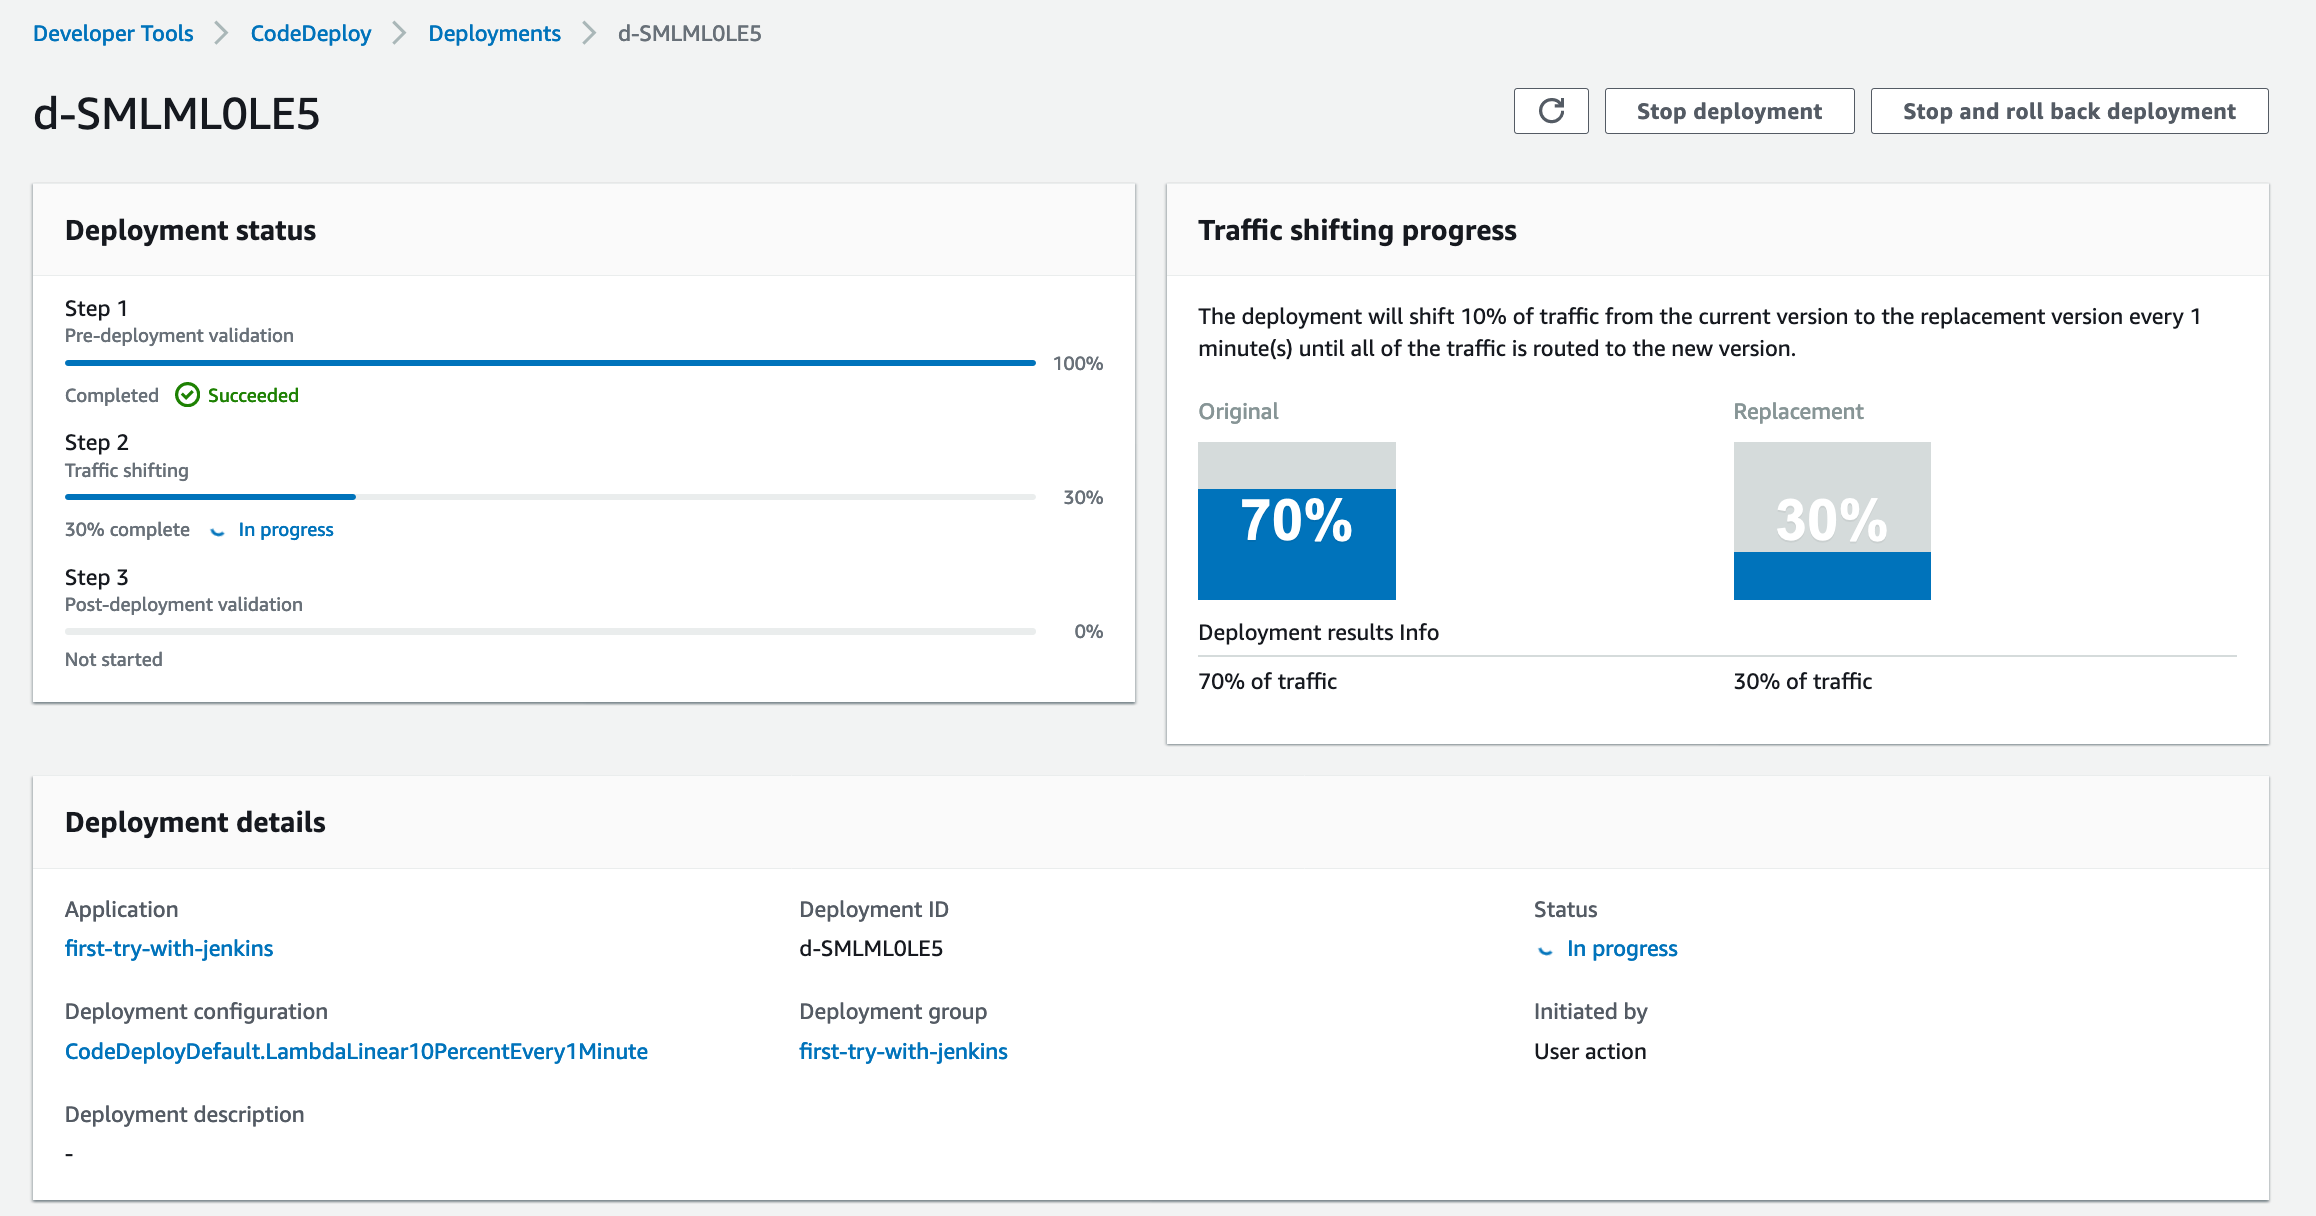
Jenkins Trigger CodeBuild and CodeDeploy to update lambda function
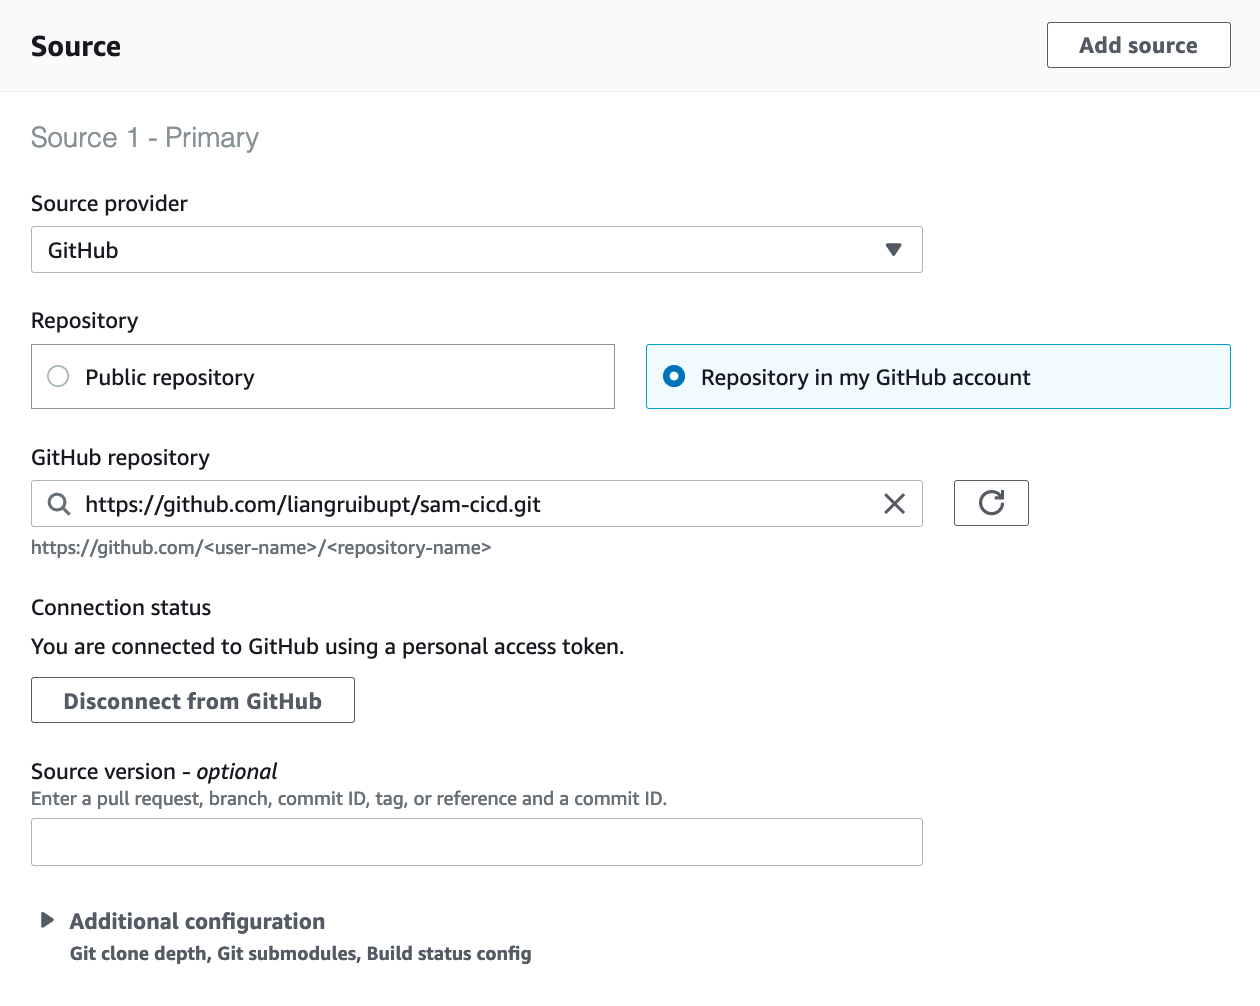
- Create the CodeBuild Project
first-try-with-jenkins- Source provider - GitHub
-
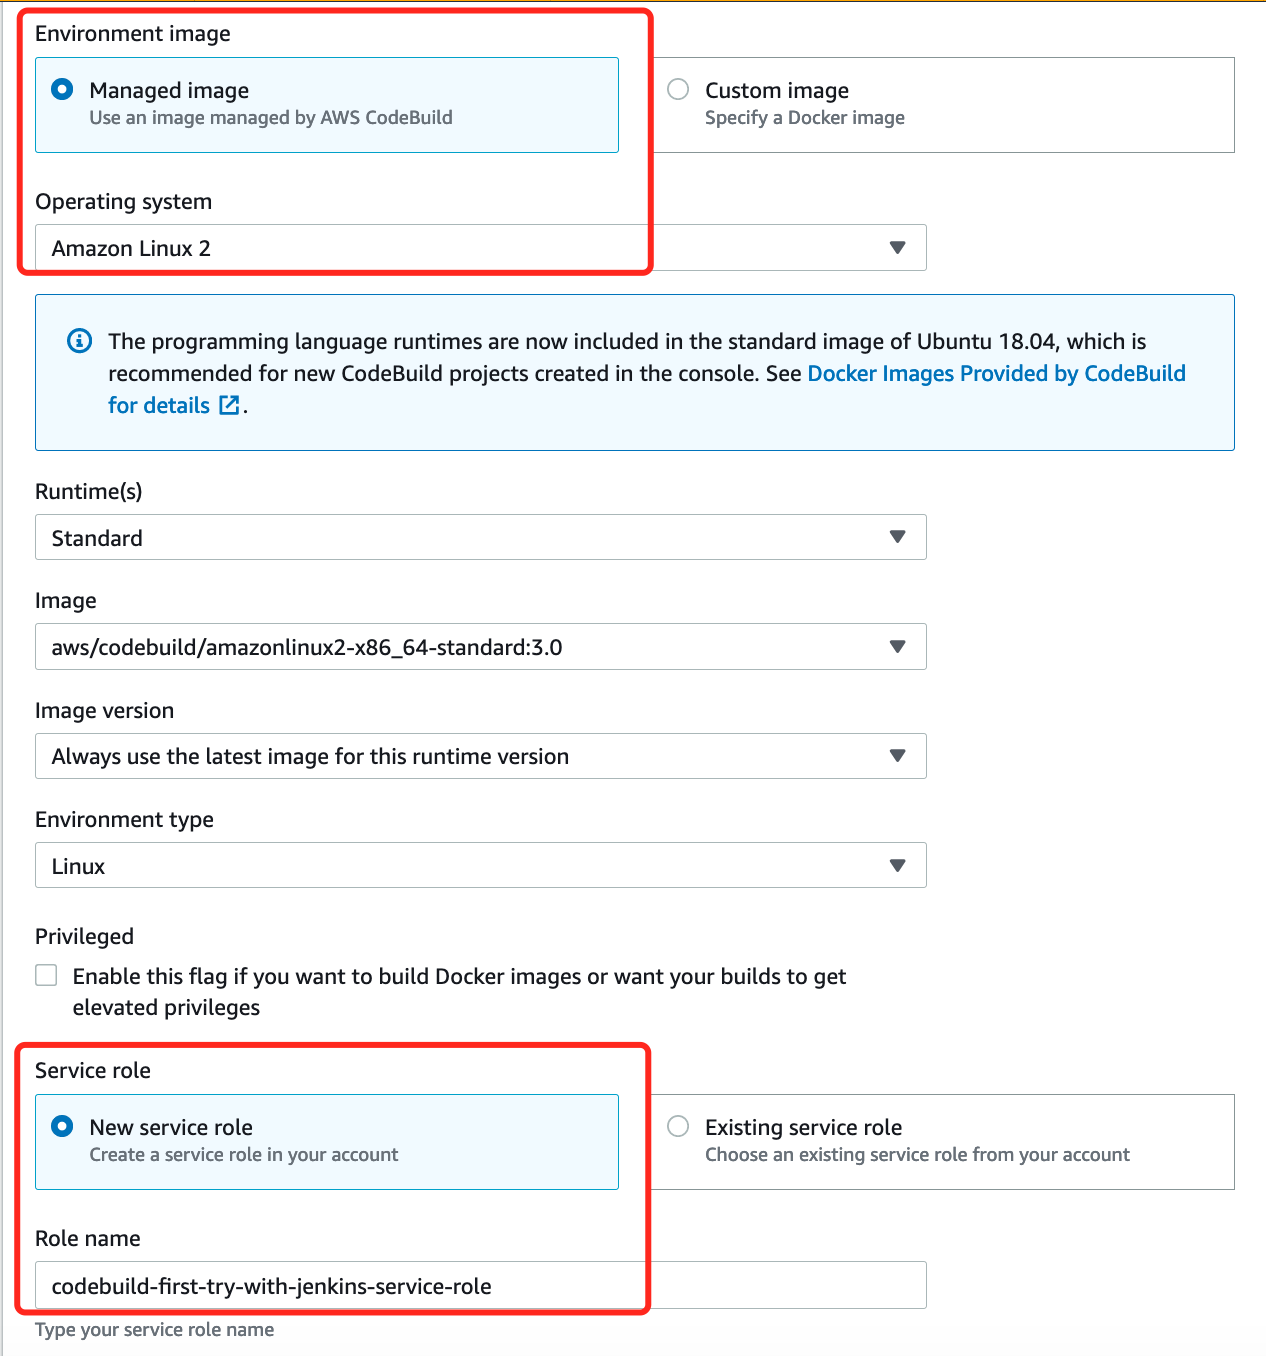
Environment
-
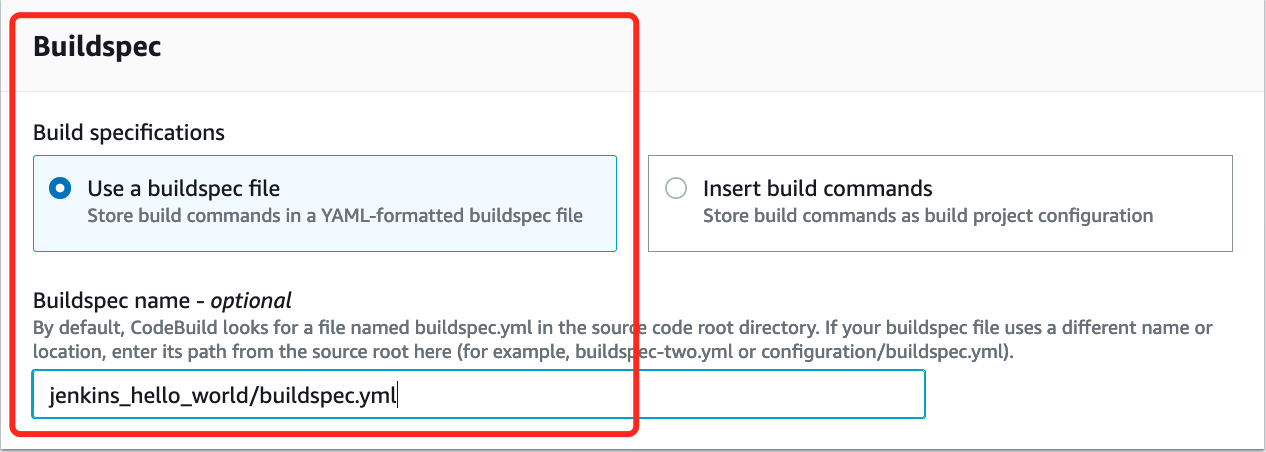
buildspec
-
Update the
codebuild-first-try-with-jenkins-service-roleby adding the- lambda permission for ‘aws lambda update-function-code’
- permission to upload data to S3 bucket
serverless-hands-on codedeploy:CreateDeploymentpermission
- Start the Build to verity the configuration and test build
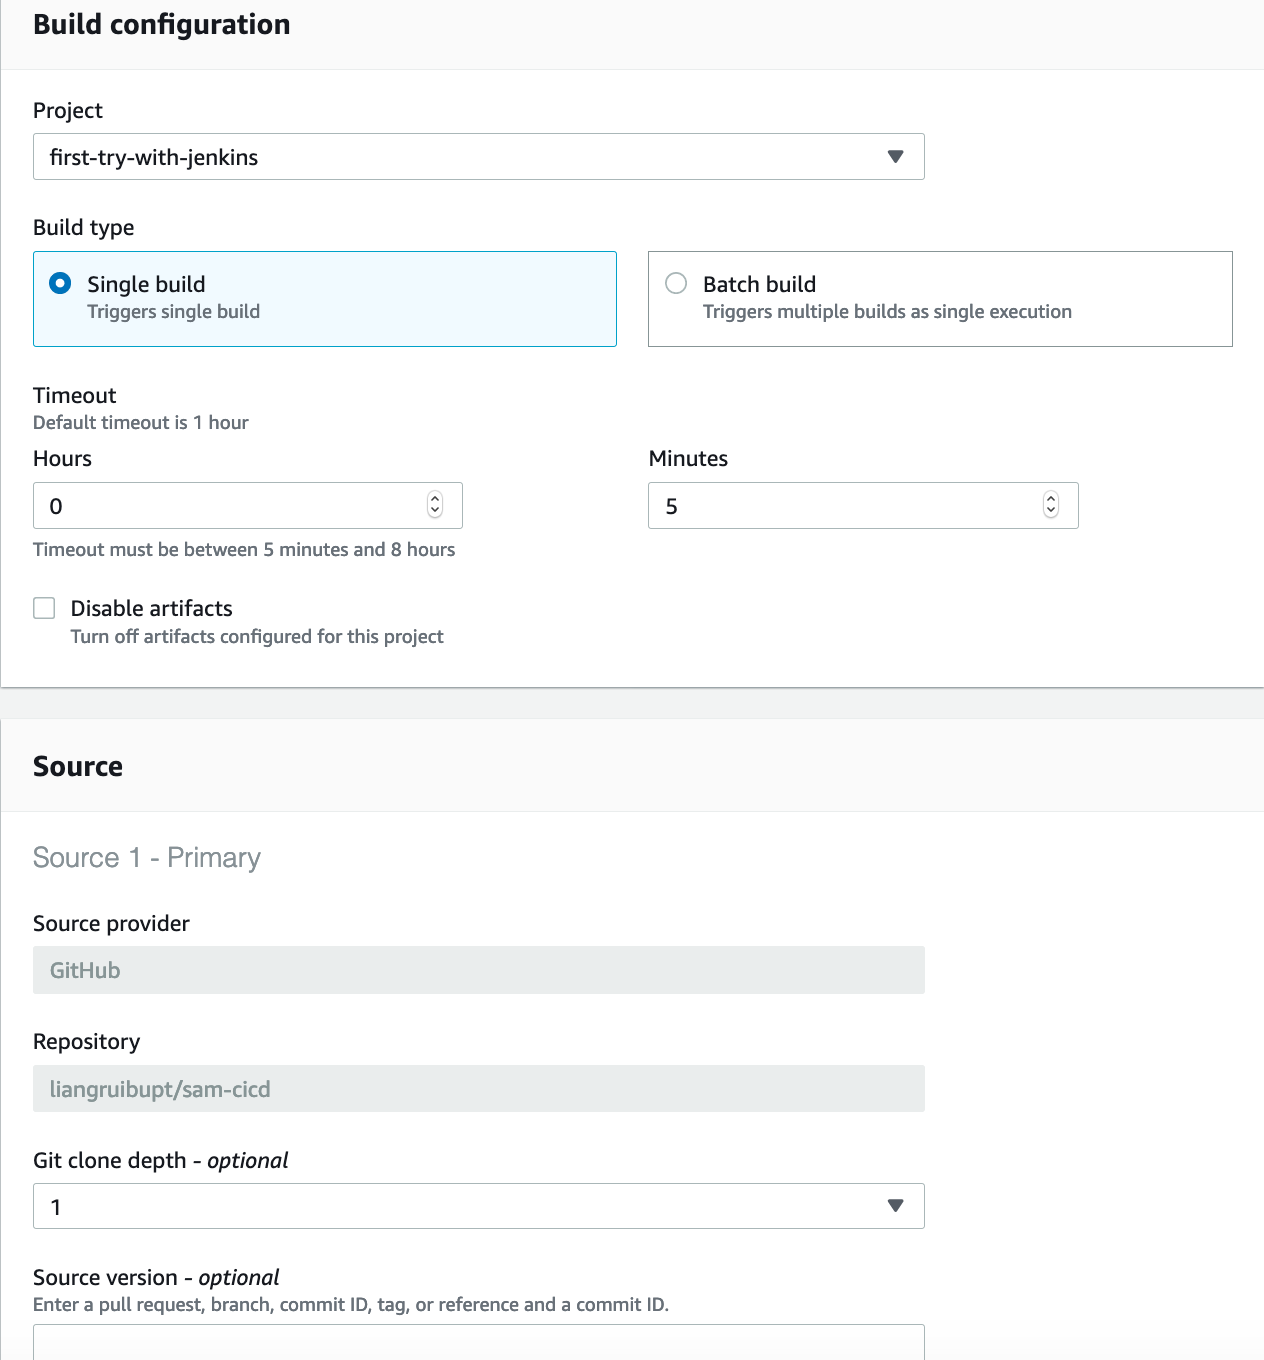

- Install Jenkins CodeBuild plugins


- Modify the Jenkins project
first-try-with-jenkins
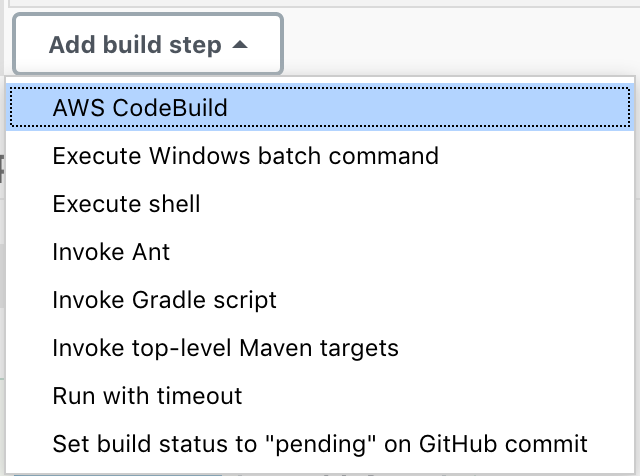
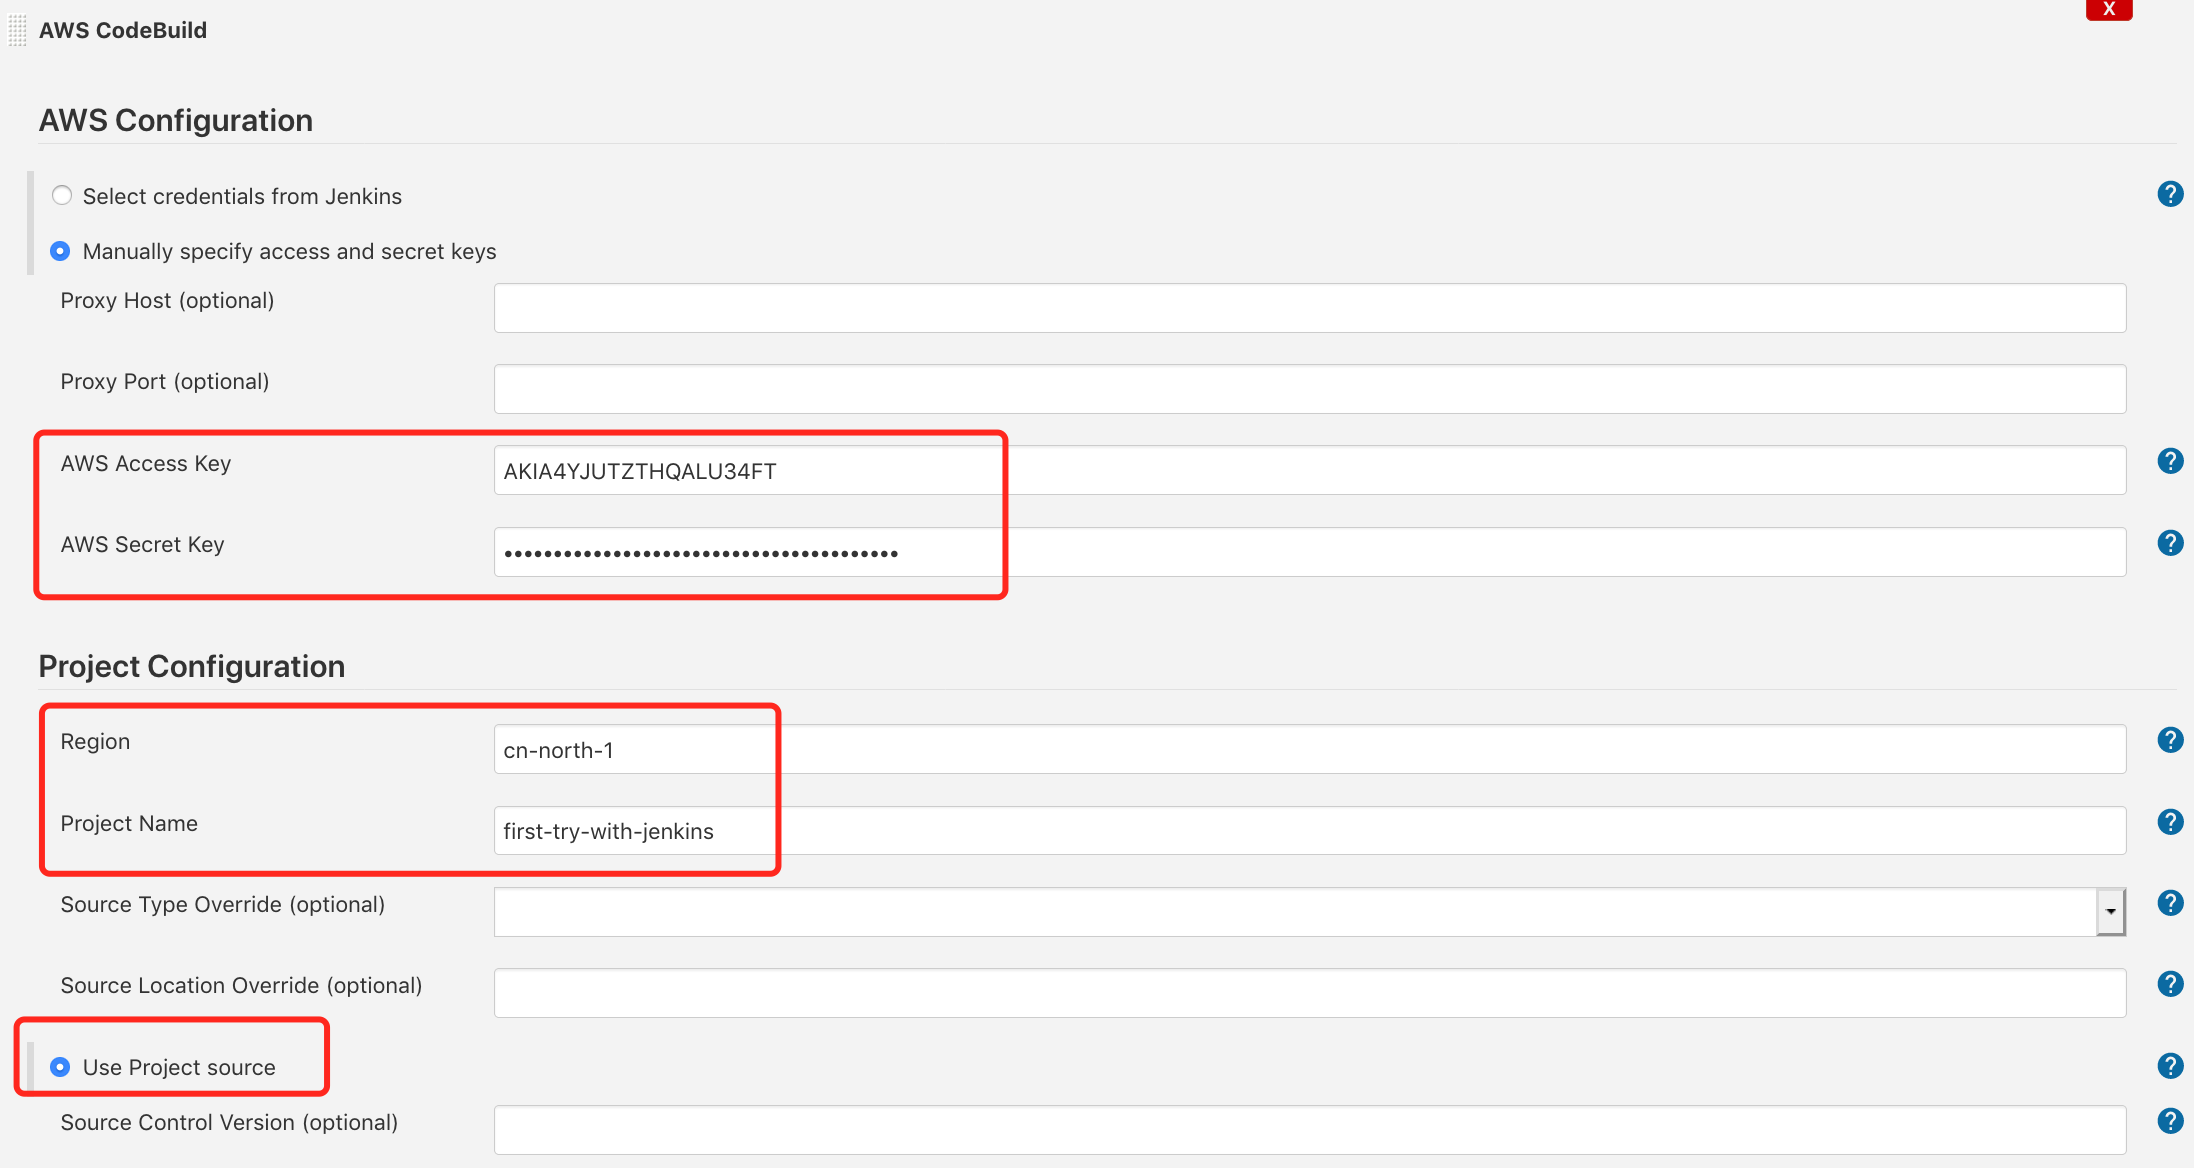
-
Replace the
execution Shellby CodeBuild. Here we will use thesam-cicd/jenkins_hello_world/buildspec.yml -
Testing


